How to deploy a branded offsite backup service on Azure 12 step guide
Are you ready to launch your own offsite backup and recovery service using a WholesaleBackup Microsoft Azure Backup Server?
Here we’ll cover everything you need to launch your own offsite backup and recovery service using the awesome power of the Microsoft Azure cloud platform.
You’ll quickly provision a Windows Server 2016 Data Center that will act as your own Azure backup server for storing customer data securely offsite using the WholesaleBackup Windows offsite backup server software.
This won’t cost you anything to test drive since Azure provides a $200 credit (*at the time of this article).
However, you will need to provide Azure with a card for billing in the case that you use the service past the initial trial period.
WholesaleBackup always provides trials also and does not require any cards to install and deploy the backup software.
0.) Signup with Azure (trial)
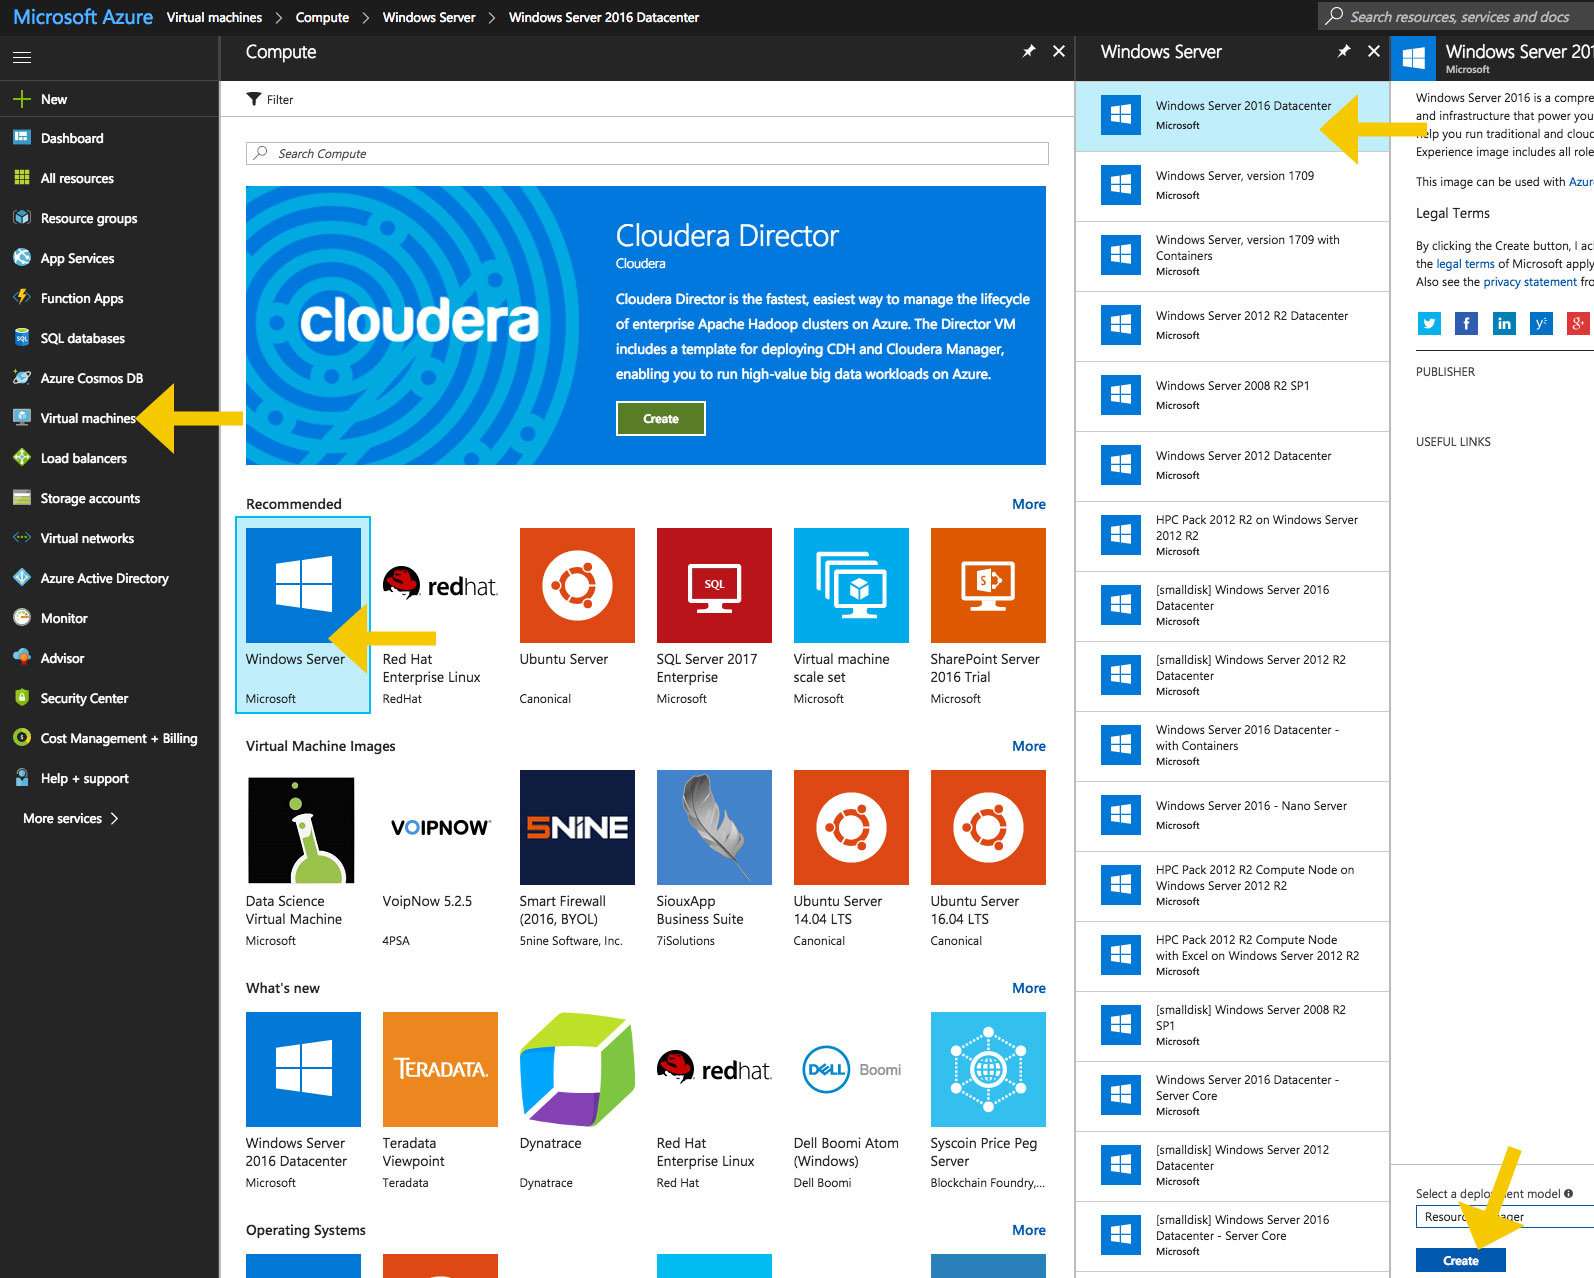
Once you’re in the Azure portal click the Virtual Machines tab and Create
Pick: Windows Server > Windows Server 2016 Datacenter Network
Then click Create.
1.) Basic settings
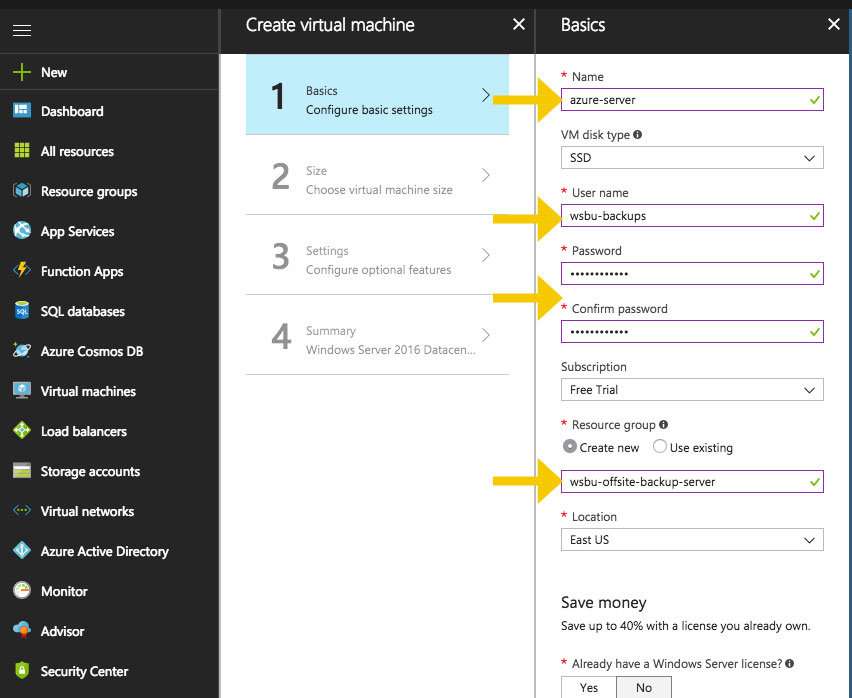
Basic settings where you’ll provide input for the *Name, *User, *Password, and *Resource group.
Then click OK.
2.) Select Instance Size
select the instance size you want, (we’re picking the default smallest for this example).
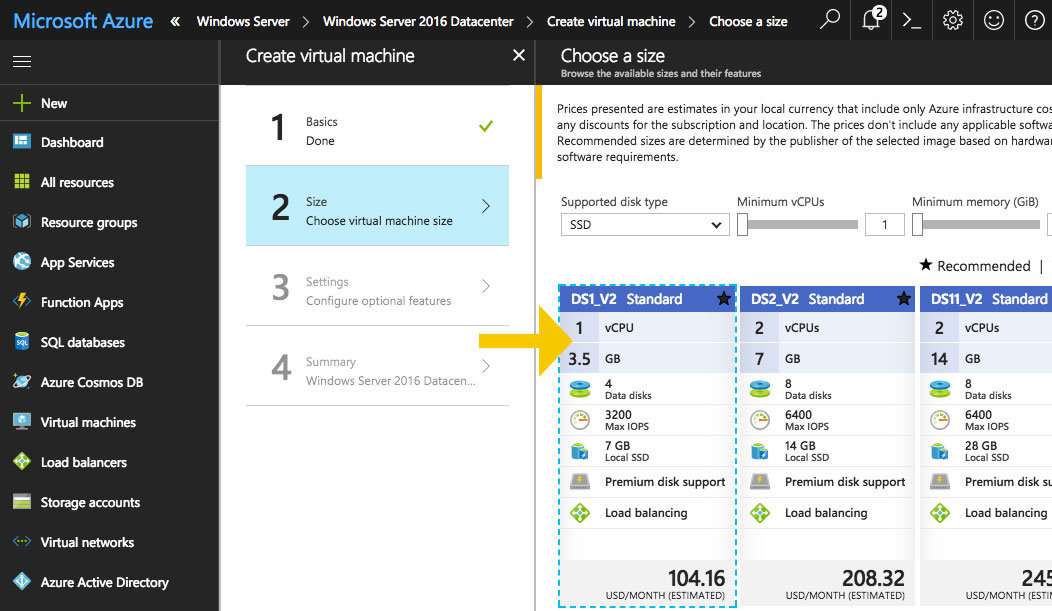
Then click Select.
3.) Configure optional features.
For this example leave:
Availability set > None
Storage use managed disks > No
Storage account > no change
Virtual network > no change
Subnet > provide a name if it’s not named already
Public IP address > change from dynamic to static
Network security group (firewall) > add a new rule for HTTPS traffic it automatically chooses port 443, and you can provide a description for the rule e.g.) allow HTTPS/SSL backup traffic
Extensions > No extensions
Auto-shutdown > Off
Monitoring > Enabled
Guest OS diagnostics > Disabled
Then click OK.
4.) Summary –
does not require anything…
… Quickly review the configuration items and if it all looks good > click Create.
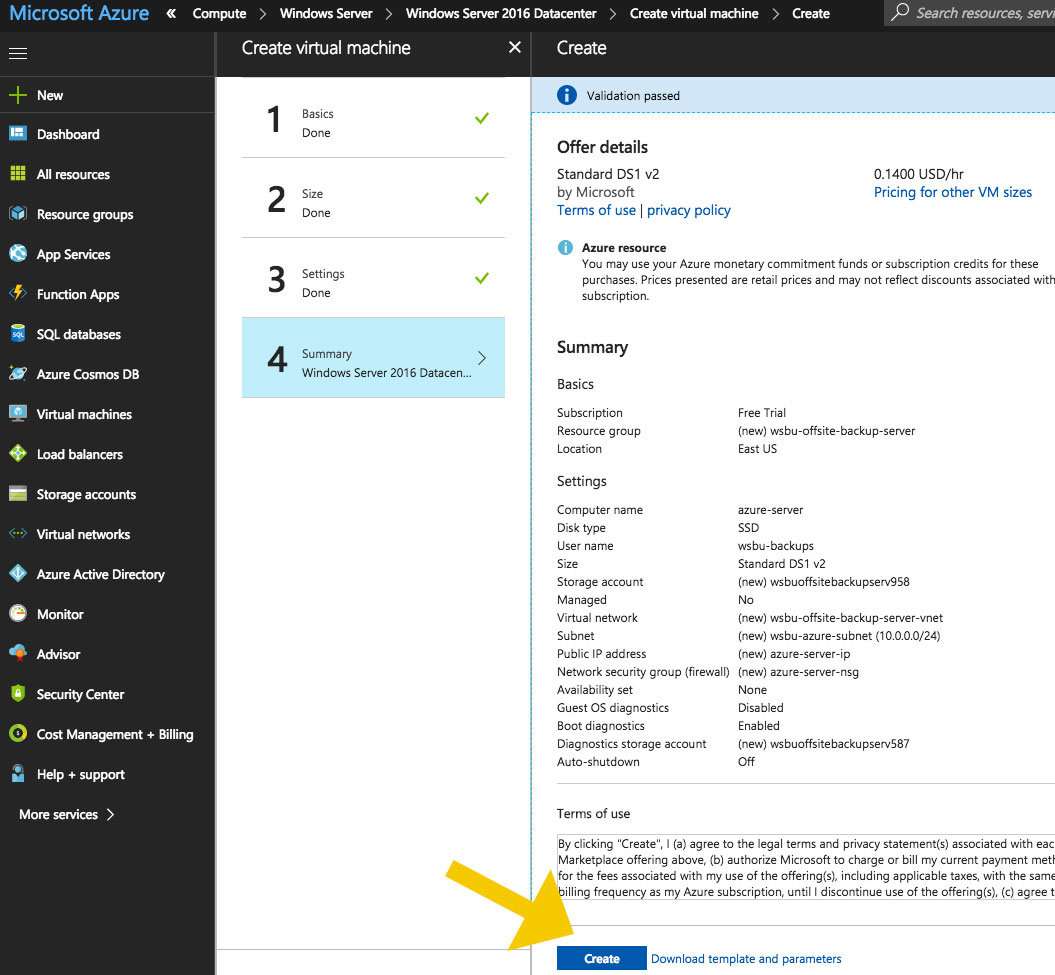
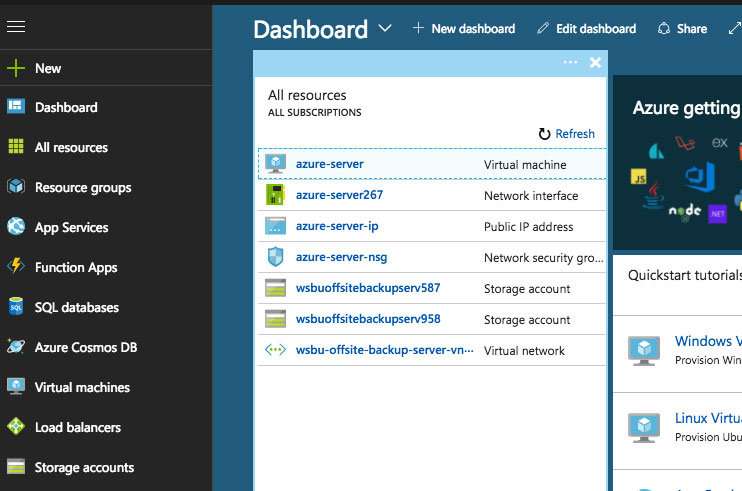
The resources are now spinning up, you can monitor the status from the notification area in the top right corner.
After everything is created within a few minutes you’ll see all of the resources in your Azure dashboard, soon you will be testing your new offsite backup service, let’s keep going.
5.) Next we’ll connect to the newly deployed Azure backup server
and install the WholesaleBackup Server Backup software right after we properly name the DNS so we can have a better FQDN (fully qualified domain name)
Click on Virtual machines > and click on your new server
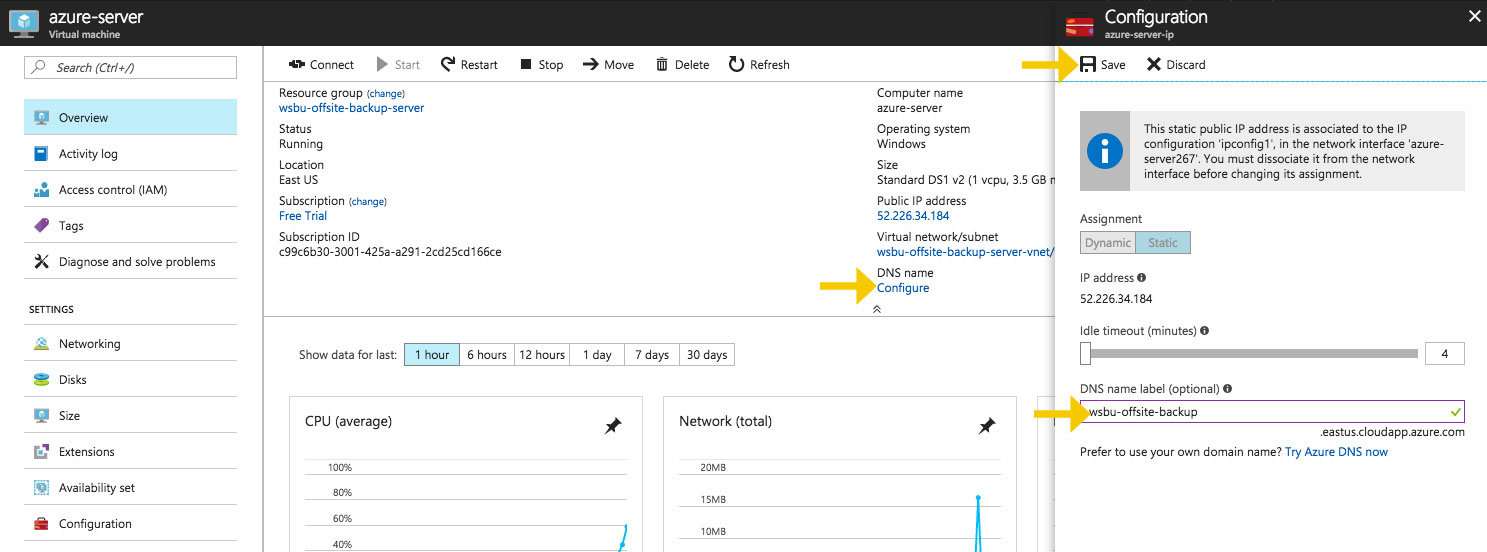
it opens up an Overview with some key items that are important to us here.
The Connect button, the static IP address, and the DNS name.
Configure the DNS name now, by clicking DNS name > Configure, and give your backup service a fully qualified domain name that matches your brand.
Then click Save.
6.) Now you’re ready to connect to the Azure backup server.
Click the Connect button in the top left corner.
It will prompt you to download the RDP file (.rdp) for connecting to the server. Save it.
Click to Open the file it should fire up your RDP client -prompting you for user credentials (the ones you created for this server). Pass it the username and password, and you’re in.
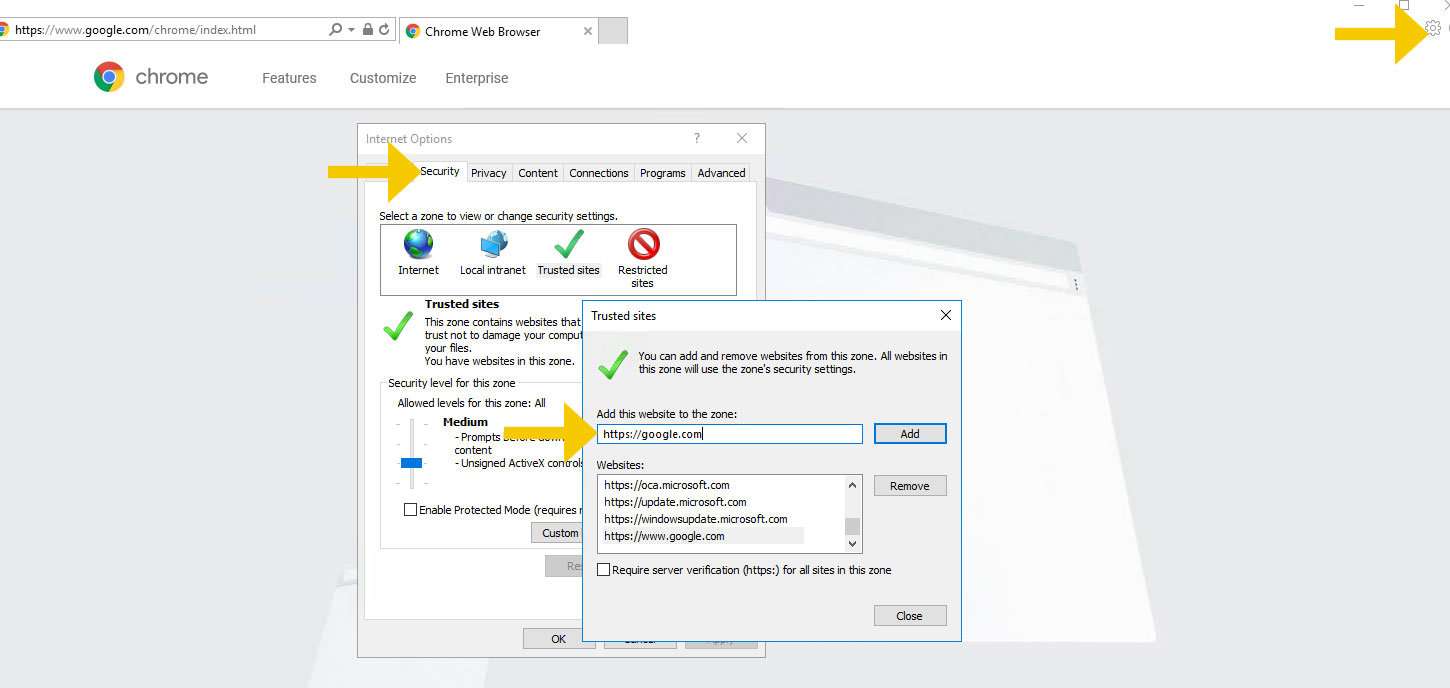
7.) You might want to do yourself a favor and download a browser like Chrome.
Since Explorer is locked down and makes using websites a nightmare.
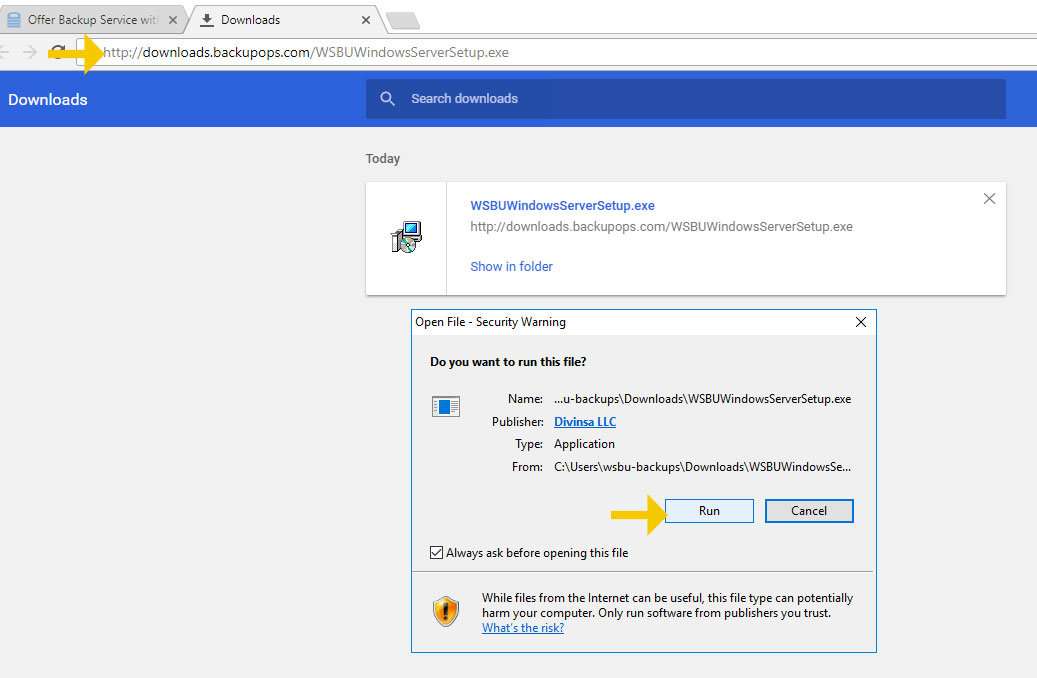
8.) Now click here to download the WholesaleBackup Server software installer
Or copy that link and paste the URL into your Azure server web browser.
After it downloads click Run.
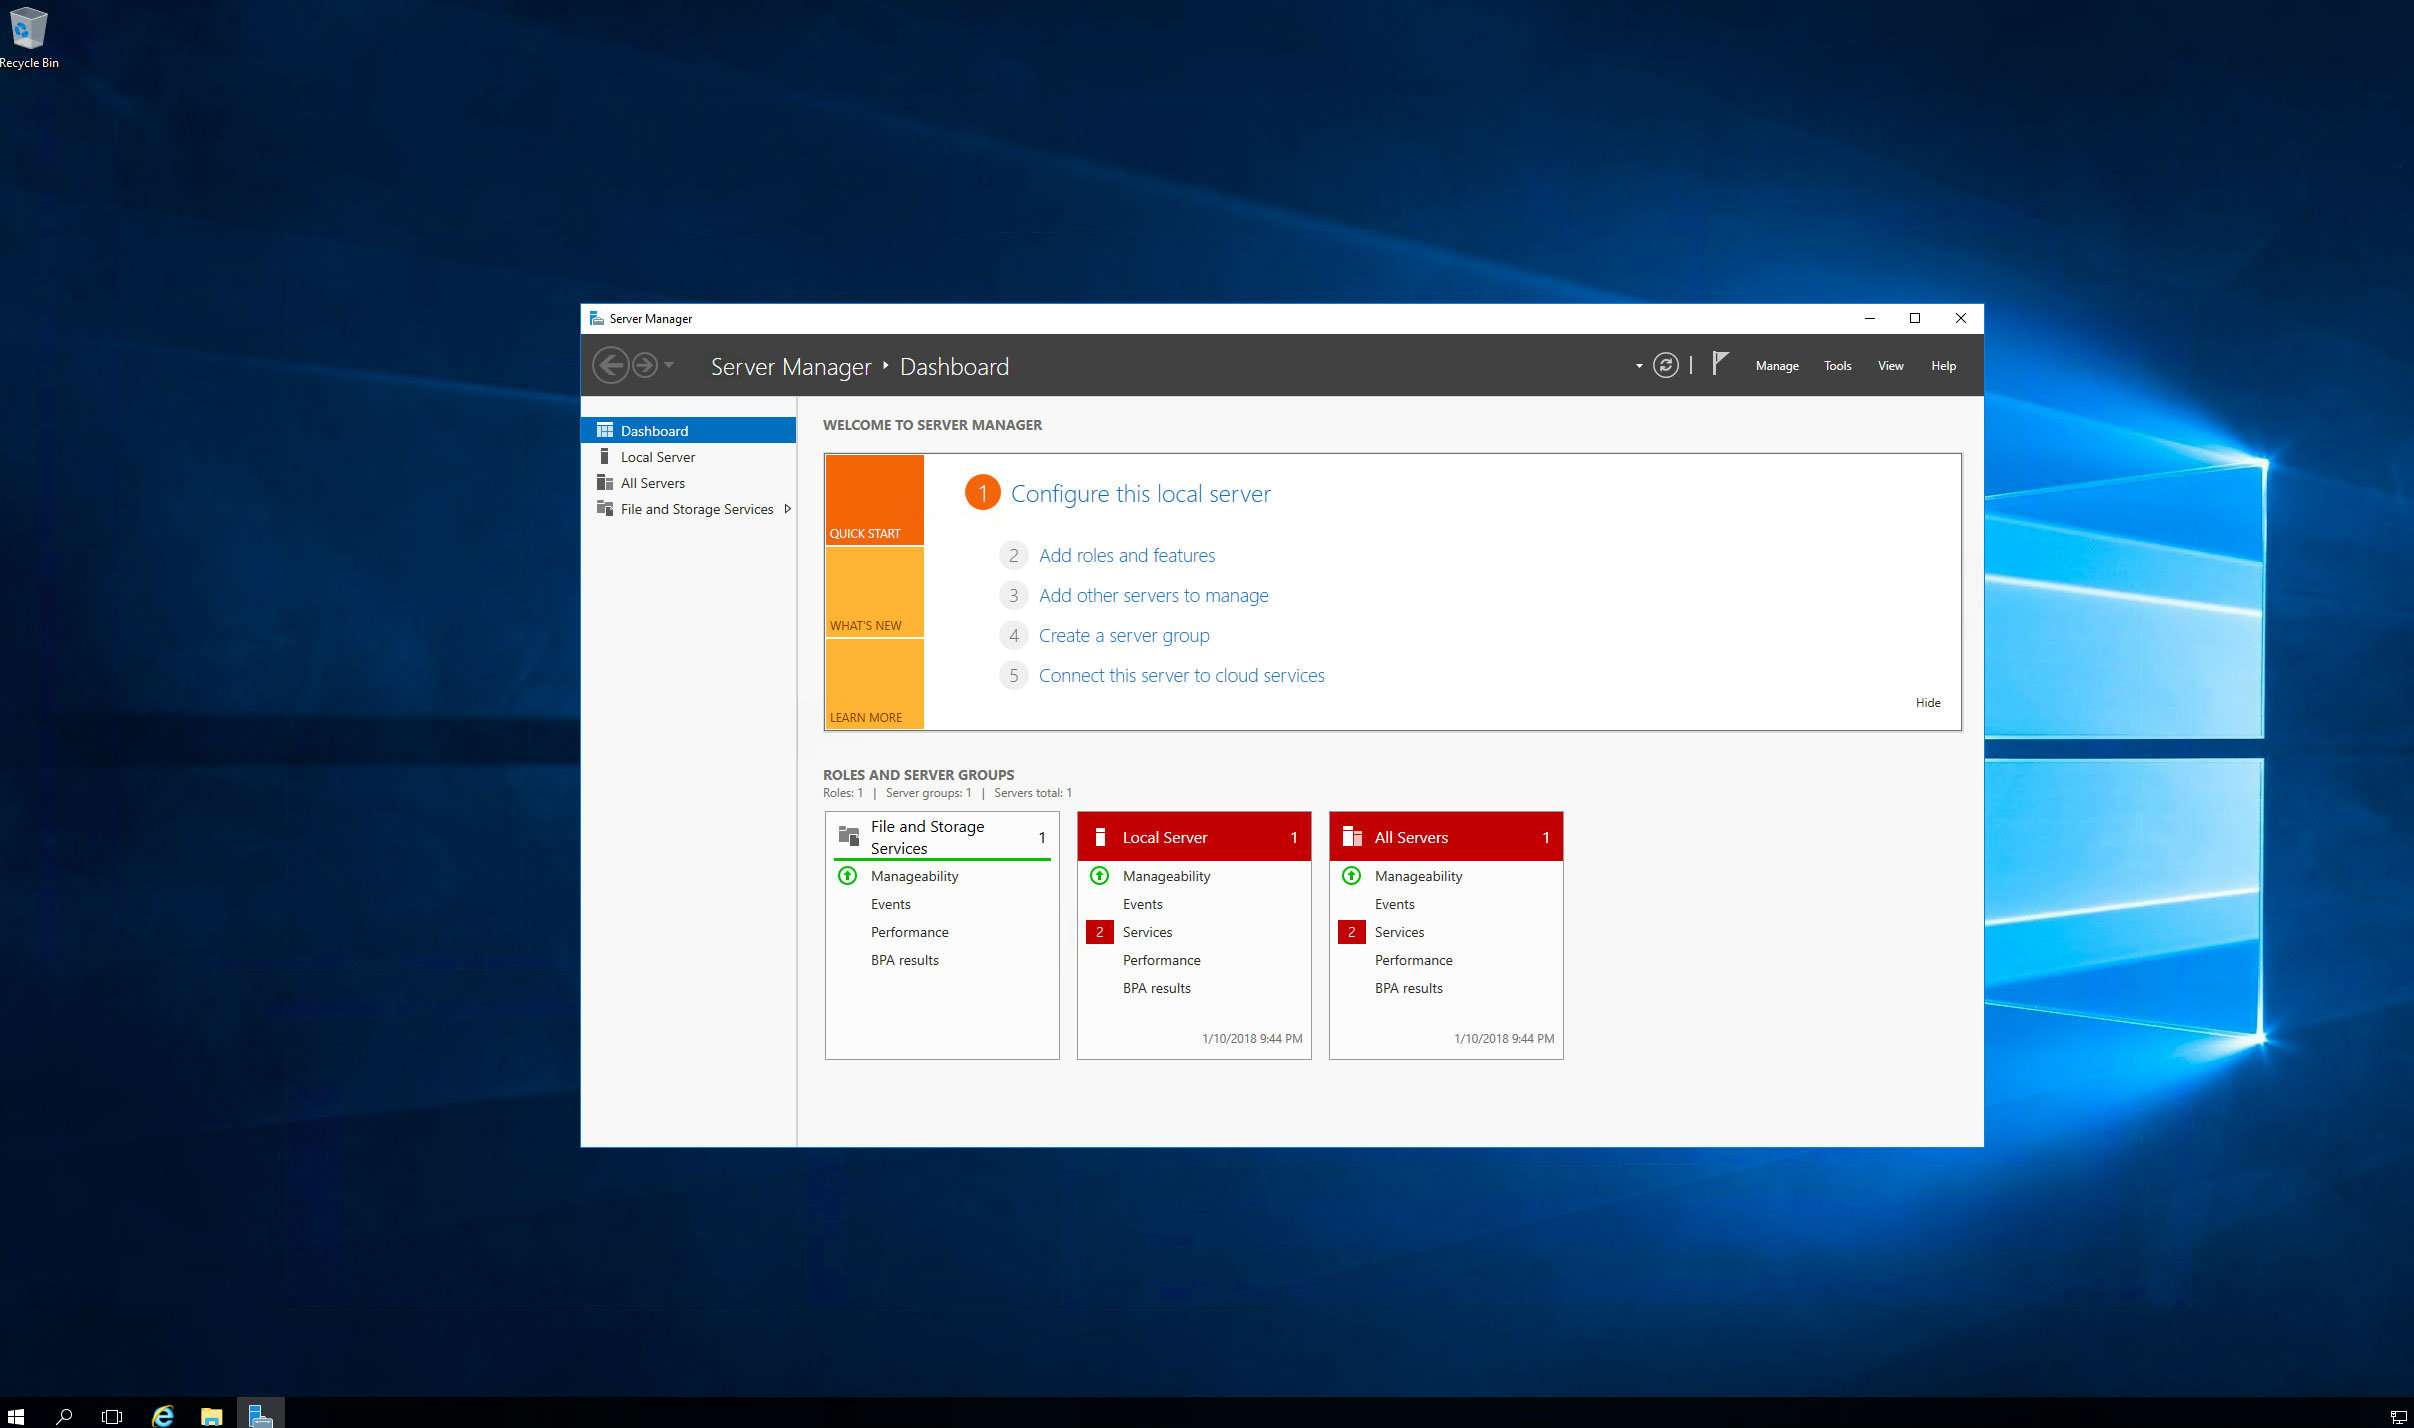
Bring up the Server Manager Dashboard (probably downsized in the taskbar)
Click Add roles and features > click Next > click Next again then click Features
Check the box for > .NET Framework 3.5 Features and click Next. And run the installation.
9.) Run the WholesaleBackup Server installer wizard.
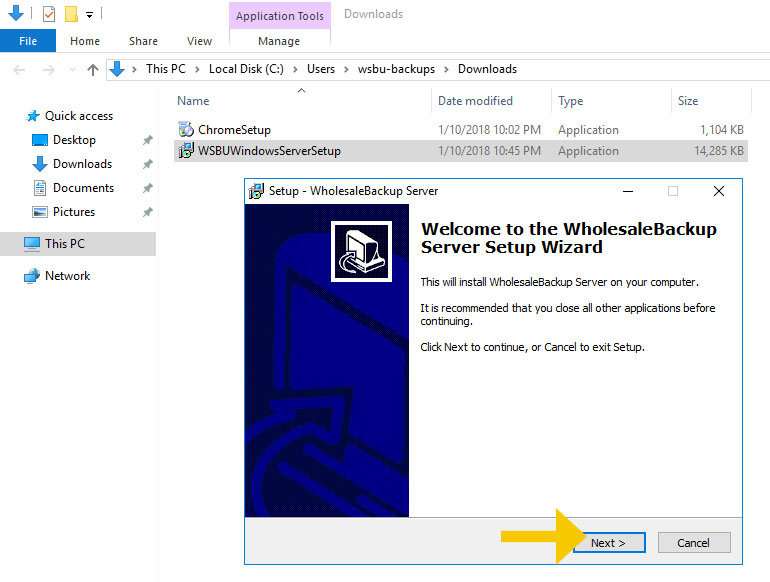
After the installer wizard is completed you’ll register and configure the backup server software.
Register and click Next
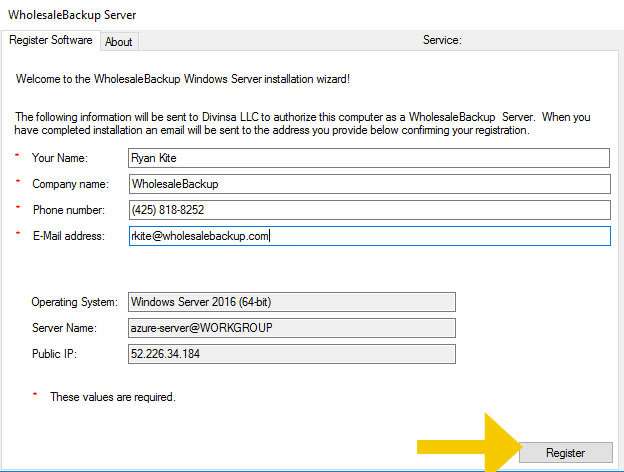
10.) The backup server software will need to be using the Static IP address or FQDN
For transmitting the backup traffic between the server and backup agents. Copy the info from the Azure Virtual machine > Overview
Then Paste it into the wizard’s form field and click Test
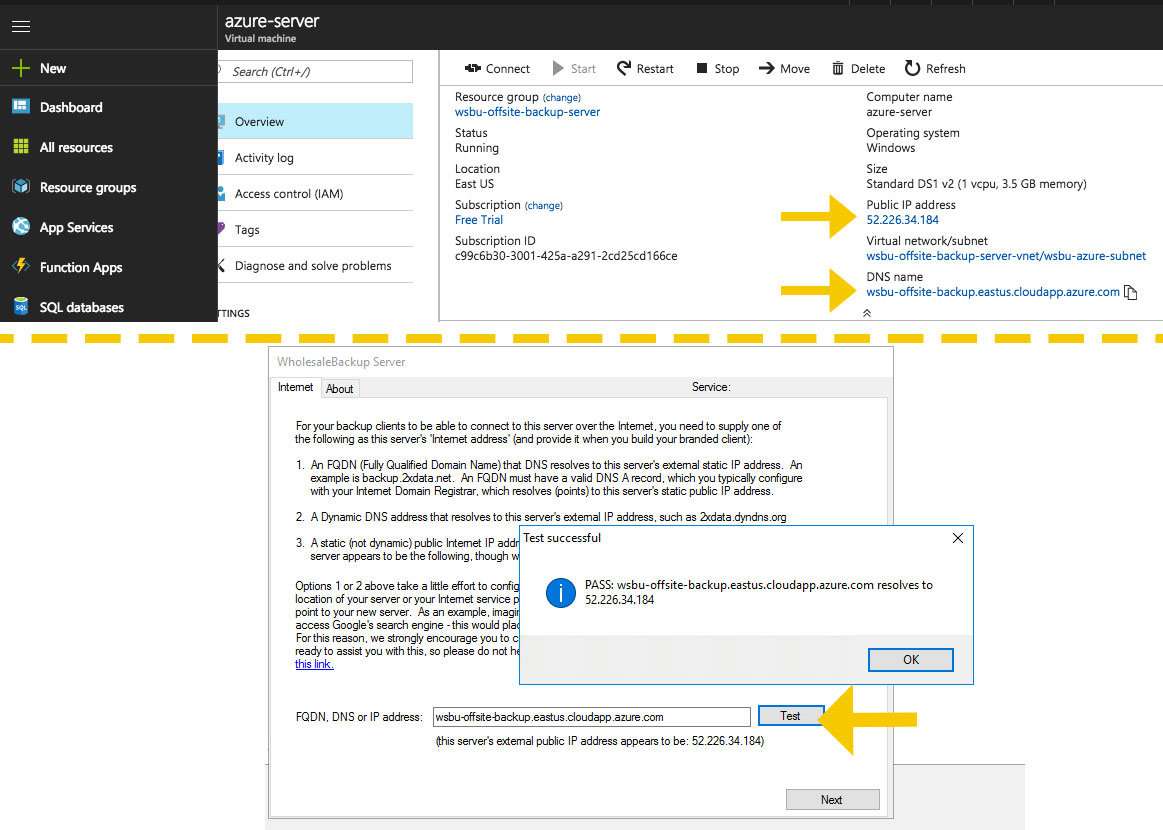
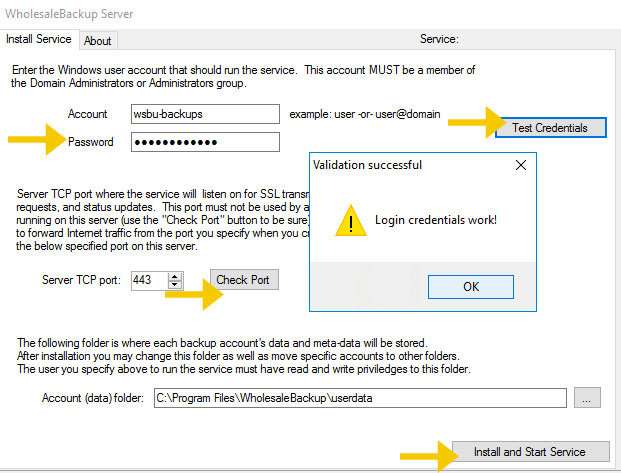
11.) Next install the backup service:
Enter the Password for the user (the one made at creation). Click Test.
Then click > Install and Start Service
Lastly, the service will perform a DNS and Firewall and Service Test
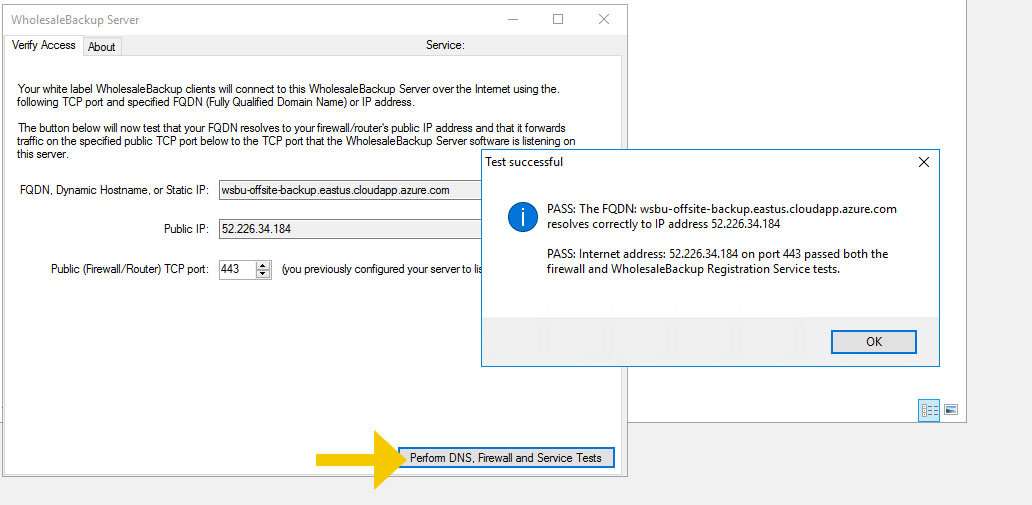
Excellent! Now the Backup Server on Azure is deployed and configured to start receiving backups from custom-branded backup agents.
In the last stretch …
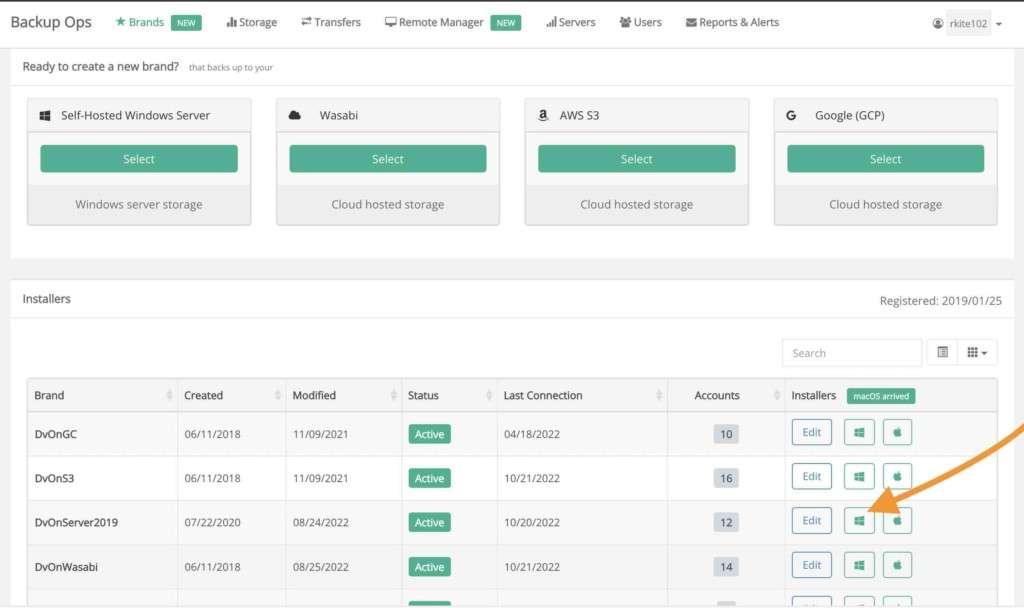
… We’ll register with the Backup Management Web Console (Backup Operations) which is where we wire up our backup clients to connect to our backup server and add all the private labeling and customizations.
The Web Console also serves as a central location for managing and monitoring your backups.
12.) The Server configuration wizard automatically prompts you with the link to register and build your backup clients or you can click here: Register with the Web Console (for zero cost).
Select Windows Server (self-hosted) for the storage option.
Then click Register account.
Follow the link to log into the Web Console and do so.
11.) In the Web Console you will see the client build form.
We’re just going to fill in the required areas initially to get this client built and launched for the sake of brevity, but you’re definitely encouraged to explore all the options and rebuild the client as often as you like.
- Phone number > fill
- FQDN or IP address (the one we created) e.g. > wsbu-offsite-backup.eastus.cloudapp.azure.com
- Port > 443
- Company name > fill
- Brand name > fill
- Title bar > fill
- Build password > create
At the bottom of the form click the Save Settings button.
The build process will start to run. It takes about 2-3 minutes. Stay on the page.
When the build is complete follow the link to download the client.
12.) Download and install your new backup client installer on any Windows operating system
The backup agent will start running backups on a set schedule or continually in the background, incrementally sending data to your offsite backup service running on Azure.
Here’s a link to documentation about the WholesaleBackup backup client to learn more about the feature-rich backup platform.
Label & launch your backup software in 5 mins
Start your all-inclusive, no-risk, free trial today
How can we help?
The team at WholesaleBackup is happy to listen and share their backup & recovery expertise spanning over 15 years of business-class backup software solutions for resellers, MSPs, and IT Pros. If you are ready to begin building a more profitable and reliable backup service you’re in the right place.
- Learn how to get started with labeling & deploying your own backup service
- See how to schedule, run backups, and restore data
- Understand how to remotely manage and monitor end-user’s backups
- Get any questions you have addressed
Take a minute to fill out the form and we’ll follow up with you about your request. For a quicker response start a conversation in the chat.
